For MC38, MC68, and SiteWatch-PRO1 Cameras
Part I: Introduction
Customers who selected a Wi-Fi Service Plan or changed Wi-Fi credentials will need to follow the steps below and setup your wireless network to prevent mobile plan charges.
Part II: Items Needed
- Active Wi-Fi Service Plan
- Sensera Systems Camera
- Mini USB cord
- Wi-Fi capable computer or mobile device
- Wi-Fi Network Name (SSID) and Password
Part III: Configuring Hotspot
The steps below must be completed within 5 minutes of activating your camera hotspot. Failure to do so will result in a timeout and you will need to start again.
- Locate the “Mini USB” port above the one for your solar panel (The cap for Sitewatch-PRO1 is black where the MC38 and MC68 are blue)
- Unscrew the “Mini USB” cap and insert your cable while plugging the larger side of it to your computer or laptop (Picture A)
- Within 1-5 minutes, the camera should make a repetitive sound which indicates Hotspot is active
- On your Wi-Fi capable computer or mobile device, open the Wi-Fi connection list
-
Find and connect to the network named MCCameraXXXX. The last four (4) digits of your camera serial number will appear instead of “X’s” (Picture B)
-
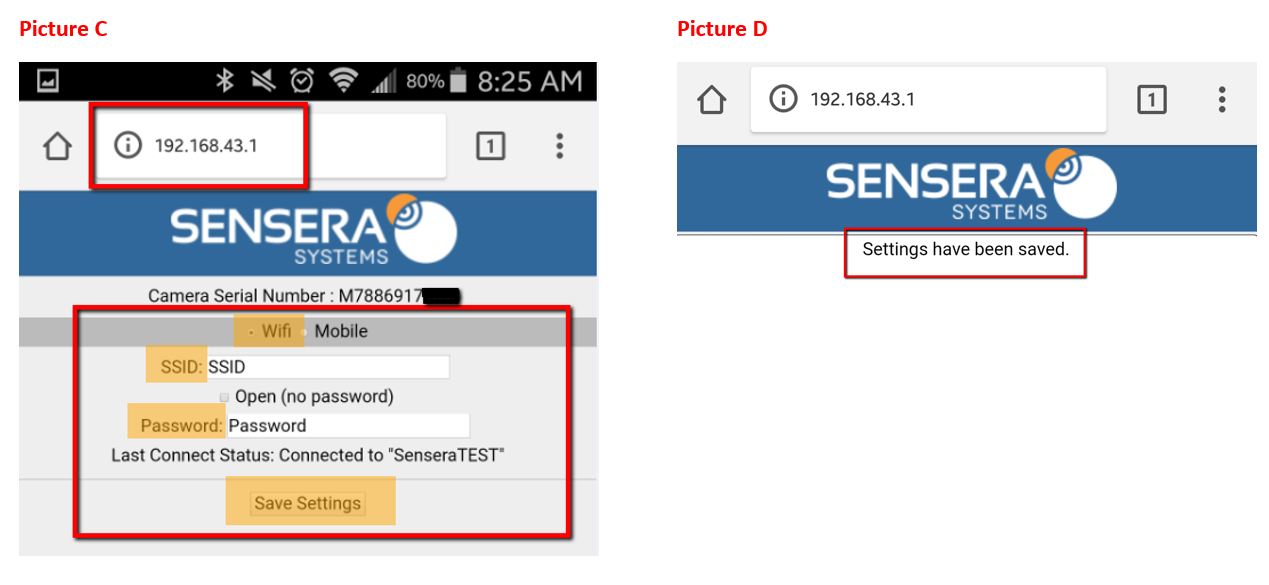
On the Wi-Fi capable computer or mobile device, open an internet browser and enter the IP Address 192.168.43.1 into the search bar
-
On the Sensera page that loaded, click the “WiFi” radio button and enter your WiFi network name (SSID) and password (Picture C)
-
A loading screen will appear and you will see a “Settings have been saved” message (Picture D)
- Deactivate the Hotspot by removing the Mini USB cord from the camera
- The camera will make the repetitive sound to indicate that the Hotspot is off
- You have now configured your camera to Wi-Fi
 Part IV: Verifying your Wi-Fi Setup
Once you’ve configured your Wi-Fi, confirm and test your setup by doing the following:
- Log into your SiteCloud account and make sure you’re on the “View” page
- On the top navigation, click on the battery percentage and signal strength drop down list (Picture E)
- Network Type should say “WiFi” and “Network Name” should be what your network name is (Picture E)
- Take and “On-Demand” picture (Picture F)
- Ensure your “On-Demand” picture displays under “Captured Images” (Picture G)
- If all the above steps pass, you have now successfully verified your setup
Picture E
Part V: Additional Notes
- Ensure you enter the correct Wi-Fi Name and Password and pay close attention to case sensitivity and/or special characters
- Confirm your camera is on before following the steps outlined above
- Ensure your Wi-Fi signal is strong enough to reach the physical location of your camera
- If your Wi-Fi password ever changes, make sure you follow the steps above to update the credential
If hotspot doesn’t activate, log into SiteCloud and check the “Camera Status” under “Captured Images“. If you see one of the following statuses, follow the details below:
- Dormant Mode: Using the Mini USB cord, plug the camera into a laptop, computer, or USB power adapter to wake up the camera. You may also use an auxiliary wall charger to do this. Check the camera status again within 5 minutes
- Low Power Shutdown: There is no battery charge left and you must plug the camera into the solar panel or auxiliary wall charger. Note: camera should charge for at least 8 hours
The above camera statuses should disappear after waking the camera. If not, please repeat the steps in Part II of this documentation or contact our support team.